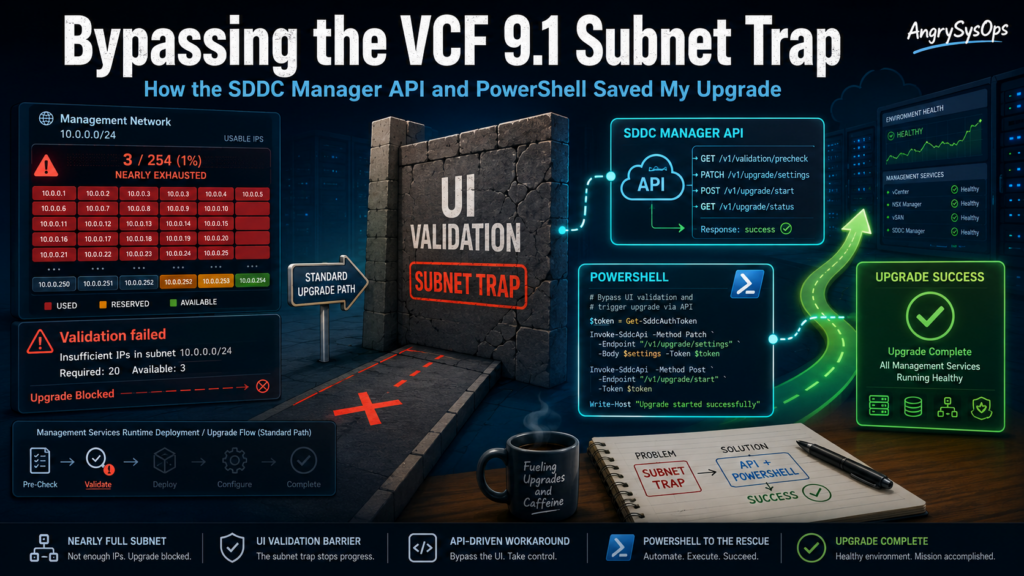
If you are gearing up for the VMware Cloud Foundation (VCF) 9.1 upgrade, grab a cup of coffee and pull up a chair. I recently went toe-to-toe with the new “Management Services Runtime” deployment phase, and let me tell you—if your legacy management network is running out of IP addresses, the SDDC Manager UI is going to set up a hard barrier and refuse to let you pass.
Today, I’m going to share how a hardcoded UI validation limitation nearly derailed my upgrade, how some quick network consolidation kept it alive, and how leveraging the SDDC Manager REST API (with an older-PowerShell twist on a script by William Lam) ultimately got me across the finish line.
The Problem: The VCF 9.1 IP Appetite & The Stubborn UI
VCF 9.1 introduces a heavy architectural shift for core management services. It deploys a containerized Kubernetes runtime framework right inside your management domain. It’s highly resilient, resource-heavy, and—most importantly—IP-heavy. The deployment requires a dedicated runtime FQDN, an internal worker node pool of at least 12 IPs, a Fleet component, an Instance component, and a dedicated License Server.
In my environment, our legacy Management Network (10.x.x.x/27) was bone dry. There was absolutely zero room to squeeze in another 15+ IP addresses.
To solve this, our network team carved out a brand-new, fully routable, dedicated network block for these services. Forward/Reverse DNS was perfect. Gateways were alive. Routing was flawless.
I confidently typed the new FQDNs and IPs into the SDDC Manager “Components Installation” wizard, clicked Validate, and watched the UI immediately break. It spat out a wall of errors:
- VCF services runtime FQDN is not on the management network.
- Fleet components FQDN is not on the management network.
- VCF License Server FQDN does not belong to management network subnet obtained from vCenter server.
The Catch: The SDDC Manager UI performs strict, client-side validation using simple subnet math. It looks at the management subnet inherited from your vCenter install, notices your new IPs don’t fit into those exact mathematical boundaries, and drops everything—ignoring the fact that your networks are fully routed and reachable.
The Architecture Plot Twist: The Split-Subnet Trap
Initially, our network design split this expansion across two small subnets: a /27 for the runtime platform pool, and a separate /28 for the ancillary components (Fleet, Instance, License).
When we eventually bypassed the UI using the API, the backend deployment engine threw a different error, revealing a major architectural requirement: Because these components run as interconnected microservices inside the exact same appliance cluster, they MUST live on the same subnet and share a single Distributed Portgroup.
The Fix: We consolidated everything into a single /27 subnet block (which offers 30 usable IPs).
- Gateway:
.1 - Runtime Platform:
.2 - The 12-IP Internal Pod Pool:
.3through.14 - Fleet, Instance, & License Server:
.15,.16, and.17
This left plenty of headroom and kept the deployment engine completely happy.
Bypassing the UI via the REST API
Broadcom officially supports deploying these management services onto non-legacy networks, but to do it, you have to bypass the UI client completely and talk directly to the SDDC Manager REST API using a custom JSON payload.
The community go-to for this is an excellent deployment wrapper script written by William Lam (https://williamlam.com/2026/06/vcf-9-1-deploying-vcf-management-services-vcfms-to-non-management-network-during-vcf-upgrade.html). His script builds the complex nested JSON body required by the /v1/vcf-management-components endpoint and tracks the validation task status.
Tweaking the Script for Legacy Jumpboxes (PowerShell 5.1)
William’s script is brilliant, but it is written natively for modern PowerShell 7+. When I ran it on our locked-down corporate Windows jumpbox—which was stuck running native Windows PowerShell 5.1—the console threw immediate errors on two modern Core methods.
https://github.com/AngrySysOps/scripts/blob/main/PowerShell/sddc_deployment_PS5-1.ps1
I took the liberty of making two surgical, backward-compatible modifications to the underlying logic so it executes smoothly on older PowerShell engines:
- The Hashing Fix: PS 5.1 doesn’t support the static shortcut
[SHA256]::HashData. I refactored the SSL thumbprint collection to use the traditional .NET Framework instance pattern:PowerShell$sha256 = [System.Security.Cryptography.SHA256]::Create() $hashBytes = $sha256.ComputeHash($cert.RawData) $sha256.Dispose() - The SSL Bypass Fix: The
-SkipCertificateCheckswitch does not exist on the PS 5.1 version ofInvoke-WebRequest. I stripped that parameter out and handled the self-signed certificate trust globally at the session layer instead:PowerShell[System.Net.ServicePointManager]::ServerCertificateValidationCallback = { $true } [System.Net.ServicePointManager]::SecurityProtocol = [System.Net.SecurityProtocolType]::Tls12
The Final Boss: The Cloud Proxy Collector Alignment
With the PowerShell script rewritten and the subnets corrected, I triggered the validation API. Almost everything went green, except for one final nagging error:
- Validate VCF Instance Cloud Proxy Registration: Verify VCF Instance Cloud Proxy Registration is properly configured.
Here is what is happening under the hood: The script doesn’t ask you for your Cloud Proxy FQDN. Instead, SDDC Manager logs into your primary VCF Operations (vROps) analytics cluster, queries its inventory, automatically discovers the registered Cloud Proxy, and attempts a validation handshake.
If your environment was recently upgraded or imported, your core VMware Cloud Foundation Adapter inside VCF Operations might still be assigned to the default analytics cluster collector group, leaving your actual Cloud Proxy sitting under “Ungrouped Collectors.”
To fix this:
- Log into your VCF Operations UI.
- Go to Administration > Integrations.
- Edit your core VMware Cloud Foundation infrastructure account card.
- Drop down to the Cloud Proxy / Group setting at the bottom.
- Move it off the default group and explicitly select your dedicated Cloud Proxy appliance from the Ungrouped Collectors list, then click Save.
How to Run: Validation vs. Live Deployment
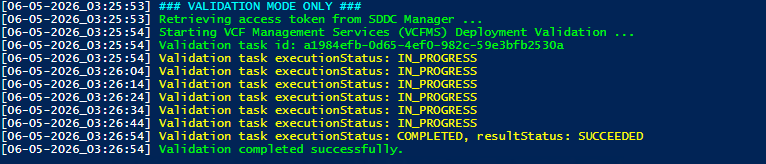
The beauty of interacting directly with the SDDC Manager API is the ability to safety-test your configuration before committing changes. The script manages this via an execution flag:
The Dry Run (Validation Mode)
Keep the flag set to true:
$ValidateOnly = $true
When executed, this instructs the script to hit the /v1/vcf-management-components/validations endpoint. It sends your custom consolidated network payload, queries password complexity, verifies firewall paths, and checks the Cloud Proxy state. It will cycle every 10 seconds until it outputs: [SUCCESS] Validation completed successfully.
The Live Push (Deployment Mode)
Once your validation checks return 100% green, change that exact line to false:
$ValidateOnly = $false
Run the script one final time. It will pass the payload to the active deployment endpoint, bypass the restricted UI pages, and begin spinning up your containerized VCF 9.1 Management plane on your brand-new network segment. You can log right back into the standard SDDC Manager UI and track the installation live from your Tasks pane.
Lesson Learned
Don’t let a rigid UI wizard limit your infrastructure design. When the standard interface hits a wall, the underlying REST API is your best friend.
Have you hit any strange validation errors during your VCF 9.1 testing? Let me know in the comments below!