VMware Cloud Foundation 9.1 is not just a “click update and hope” release. If you are running VCF 9.0.2 and planning the move to 9.1, the upgrade needs to be handled as a controlled sequence across VCF Operations, SDDC Manager, NSX, vCenter, ESX, and any adjacent components such as Avi Load Balancer, VMware Live Recovery / Site Recovery Manager, and vSphere Replication.
As always: do not run this blindly in production. Validate the target bill of materials, check interoperability, take backups, confirm snapshots where supported, run prechecks, and make sure you understand the rollback boundaries before touching anything.
Why the Upgrade Order Matters
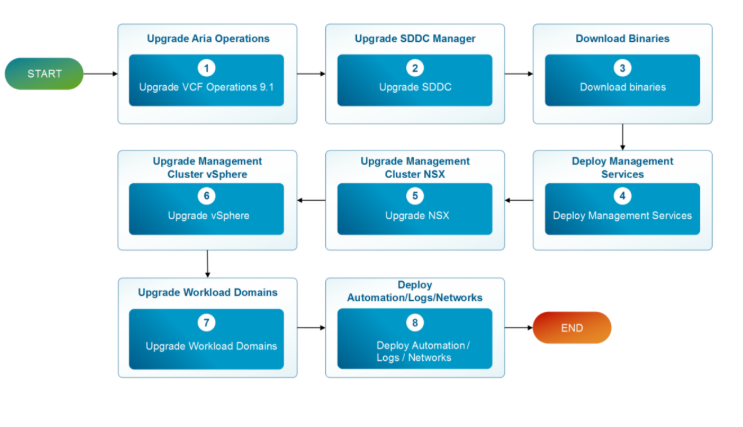
VCF upgrades are not isolated component upgrades. The platform has dependencies between lifecycle management, operations, SDDC Manager, NSX, vCenter, ESX, and supporting services. That is why the upgrade order matters.
The practical upgrade flow is:
- Validate prerequisites and compatibility.
- Upgrade VCF Operations from 9.0.x to 9.1.
- Configure the online depot in VCF Operations.
- Download the required VCF 9.1 binaries.
- Deploy VCF Management Services.
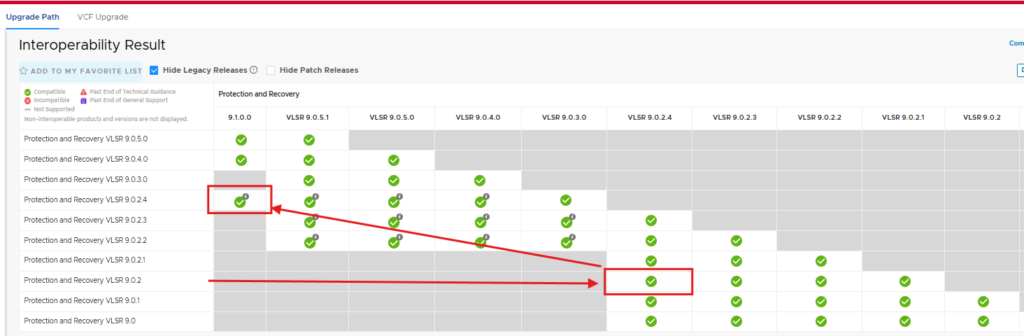
- Upgrade or converge VMware Live Recovery / SRM and vSphere Replication where applicable.
- Upgrade Avi Load Balancer before the main SDDC Manager sequence if Avi is present.
- Upgrade SDDC Manager to 9.1.
- Plan the management domain upgrade.
- Run upgrade prechecks.
- Upgrade NSX.
- Upgrade vCenter.
- Import or assign the ESX image.
- Upgrade ESX hosts.
- Verify versions, logs, health, and remove temporary safety controls after validation.
That sequence is important because VCF Operations becomes the control point for lifecycle operations in the 9.x model. You do not want to discover halfway through the upgrade that depot access, binary management, or fleet inventory migration was not completed correctly.
Pre-Upgrade Checklist
Before starting the upgrade, make sure the environment is ready. This is the boring part, which means it is also the part that saves your weekend.
1. Confirm the Bill of Materials
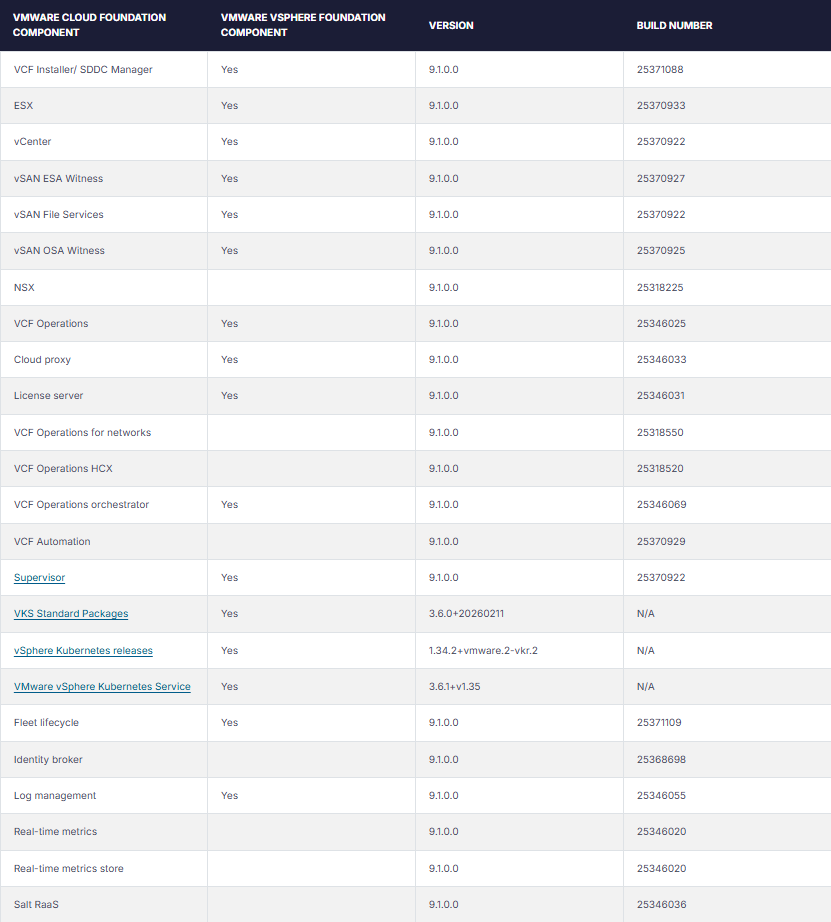
Start with the target VCF 9.1 bill of materials and confirm every component version. Do not assume that a component is compatible because it is “close enough”. Check the official interoperability matrix and verify the supported path for every product in the stack.
Pay particular attention to components that are easy to forget because they sit slightly outside the normal SDDC Manager lifecycle path, such as load balancers, recovery appliances, and replication components.
2. Check Avi Load Balancer Compatibility
If Avi Load Balancer is deployed in the environment, upgrade it before the main SDDC Manager upgrade sequence.
Do not skip Avi prechecks. Load balancer health issues are the kind of thing that can turn a clean platform upgrade into an incident bridge.
3. Back Up SDDC Manager and Core Components
Before upgrading SDDC Manager, confirm that you have a recent successful SDDC Manager backup stored on an external SFTP server. Also make sure recent backups exist for the other managed components.
4. Take Supported Snapshots
For vCenter, taking a snapshot before the upgrade is especially important because the vCenter upgrade flow uses a temporary network configuration during the process.
After the upgrade is completed and validated, remove snapshots. Do not leave old infrastructure snapshots sitting around. That is how you get storage waste, performance problems, and future confusion.
5. Prepare Temporary Network Details for vCenter
The vCenter upgrade requires temporary network details. Prepare the following before starting:
- A free temporary IP address from the same subnet.
- Subnet mask or prefix details.
- Default gateway.
- Any required DNS details, using anonymised or documented values in your internal change plan.
Do not discover this information during the change window. Have it validated before you click Schedule.
6. Allocate a New CIDR Block for VCF Management Services
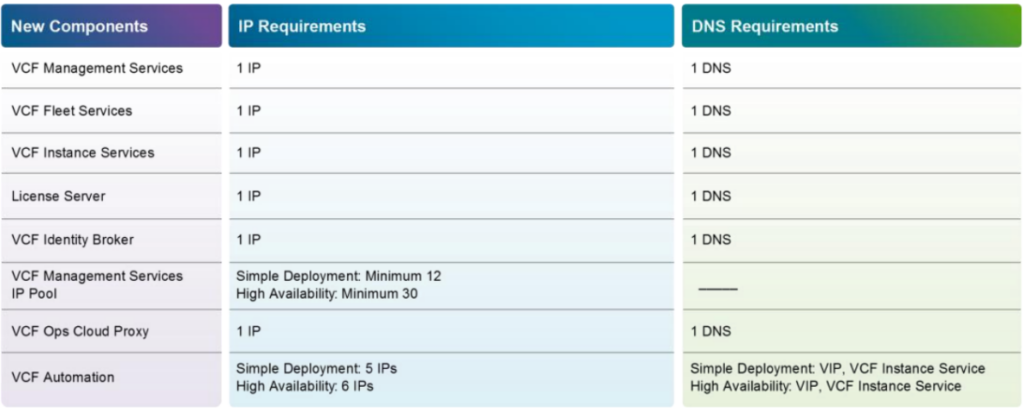
One of the most critical architectural changes in VCF 9.1 is the introduction of a unified VCF Management Services cluster. This new service replaces the standalone VCF 9.0 Fleet Management Appliance and the VMware Identity Broker (vIDB), acting as the new “Universal Remote” for lifecycle, licensing, and operational capabilities.
You cannot skip this, and you cannot reuse your existing 9.0.2 IPs.
While you deploy the new VCF 9.1 Management Services cluster, your old 9.0.2 components are still online orchestrating the upgrade. Reusing IPs would cause massive network collisions mid-upgrade.
Before starting the upgrade in SDDC Manager, you must:
- Carve out a new CIDR Block: The new Management Services cluster requires a minimum of 12 free IP addresses on your Management VLAN. Because the upgrade wizard strictly requires an IP Pool defined in CIDR format (rather than an IP range), you must provide at least a /28 subnet (which yields 14 usable IPs). If you have the space, a /27 (30 usable IPs) is highly recommended for future scale-out.
- Prepare DNS: Create the necessary forward and reverse DNS records (FQDNs) for these new services (e.g., license server, service-runtime, fleet-lifecycle) prior to kicking off the deployment.
Do not wait until the wizard prompts you for this CIDR block to start calling your network team. Get this /28 or /27 routed and ready beforehand.
Step 1: Upgrade VCF Operations to 9.1
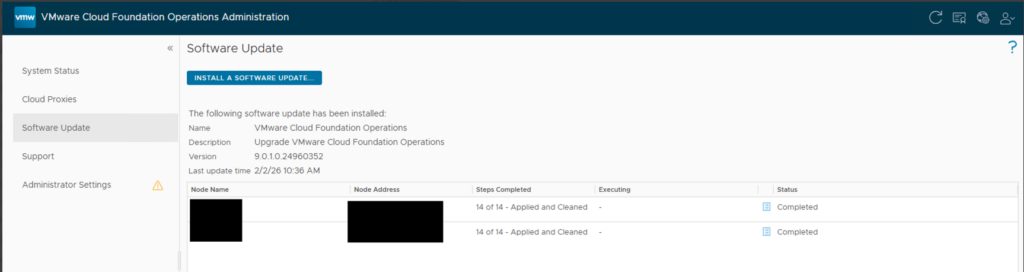
The first major step is upgrading VCF Operations from 9.0.x to 9.1. This is done by uploading the VCF Operations 9.1 upgrade PAK file to the VCF Operations administrator interface.
The high-level process is:
- Download the VCF Operations 9.1 upgrade PAK file from the Broadcom Support Portal.
- Log in to the primary VCF Operations node administrator interface.
- Open Software Update.
- Click Install a Software Update.
- Upload the PAK file.
- Accept the EULA and release information.
- Start the installation.
- Log back in after the administrator interface restarts.
- Monitor the update from the Software Update page.
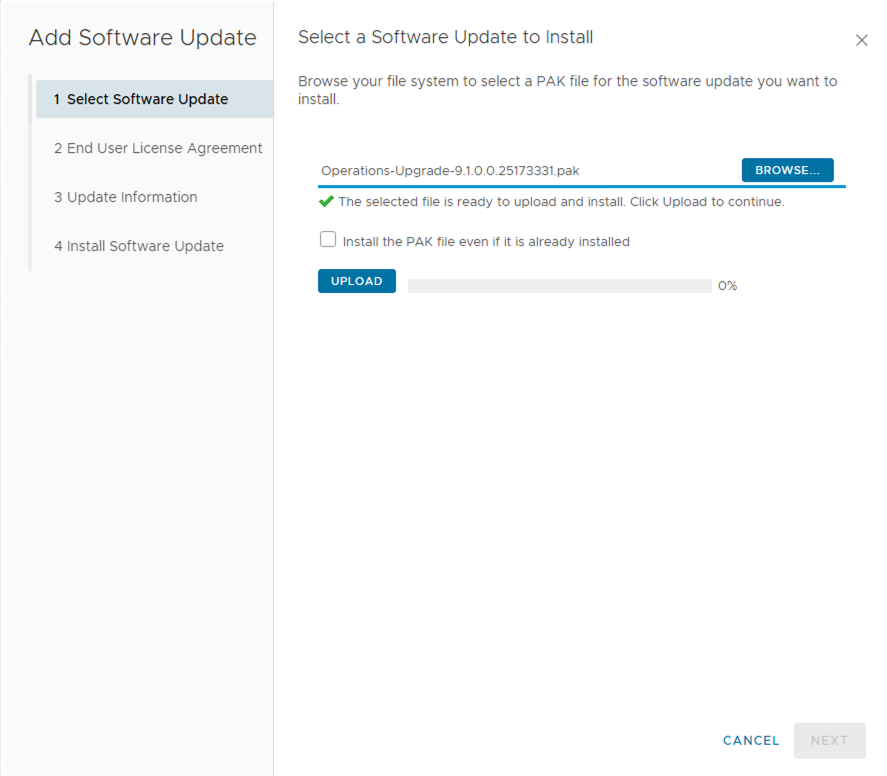
During the upgrade, expect the VCF Operations administrator interface to restart. You may be logged out. That is normal. Log back in and continue monitoring the status.
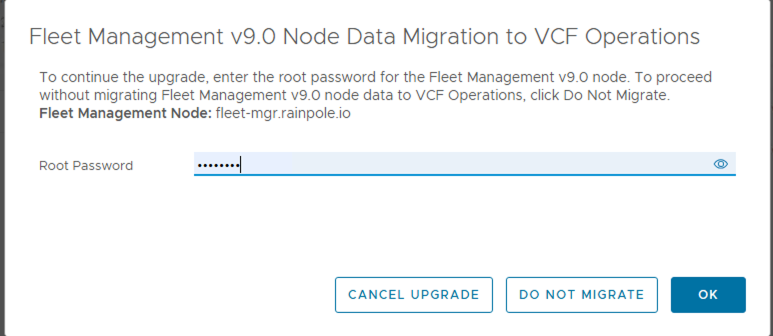
Fleet Management Migration
Wait for the migration dialog to appear, provide the root password for the previous fleet management appliance, and allow the migration to complete.
Once the VCF Operations cluster upgrade completes, the associated cloud proxy is upgraded as well. The older VCF Operations fleet management appliance is then decommissioned and powered off.
Watch the cluster status carefully. The cluster may show as offline and then transition to going online while the installation progresses. Wait until all nodes and the cluster show an online status before moving on.
Step 2: Configure the Online Depot
After VCF Operations has been upgraded, configure the online depot. This allows VCF Operations to access and download the required upgrade bundles.
The process is simple:
- Log in to VCF Operations with an account assigned the Administrator role.
- Select Build.
- Open Depot Settings.
- Click Configure for the online depot.
- Enter the activation code from the business services console.
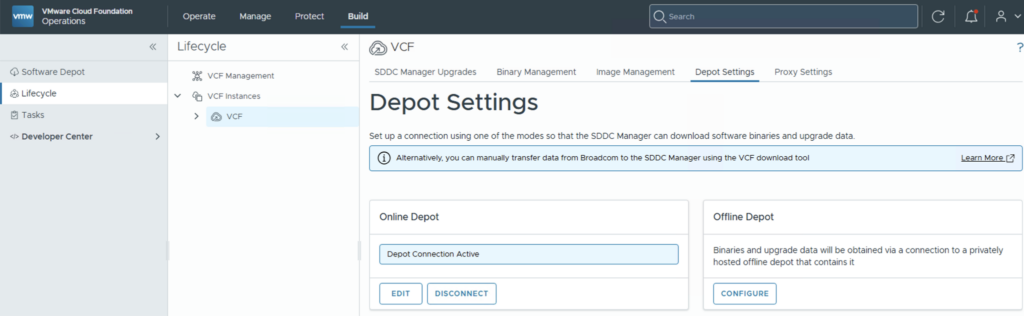
- Verify that the depot connection is active.
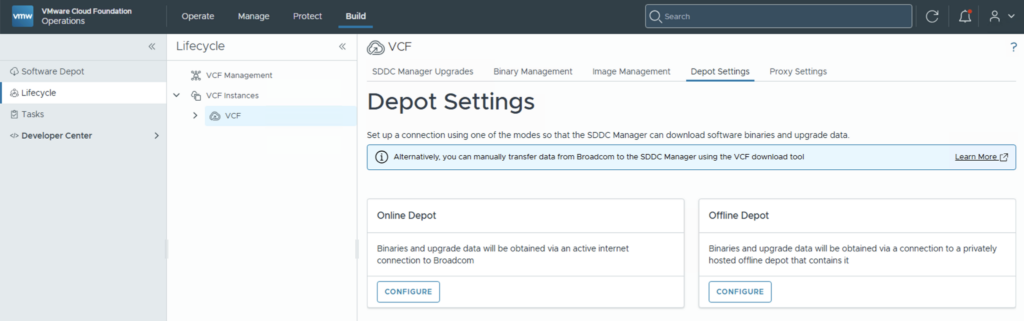
This step sounds minor, but it is critical. If the depot is not active, binary download and lifecycle management become the next problem you have to troubleshoot.
Step 3: Download the Required Binaries
Once the depot connection is active, download the required upgrade bundles.
- Log in to VCF Operations.
- Select Build.
- Open Lifecycle.
- Select the relevant VCF instance.
- Open Binary Management.
- Select the required upgrade bundles.
- Click Download.
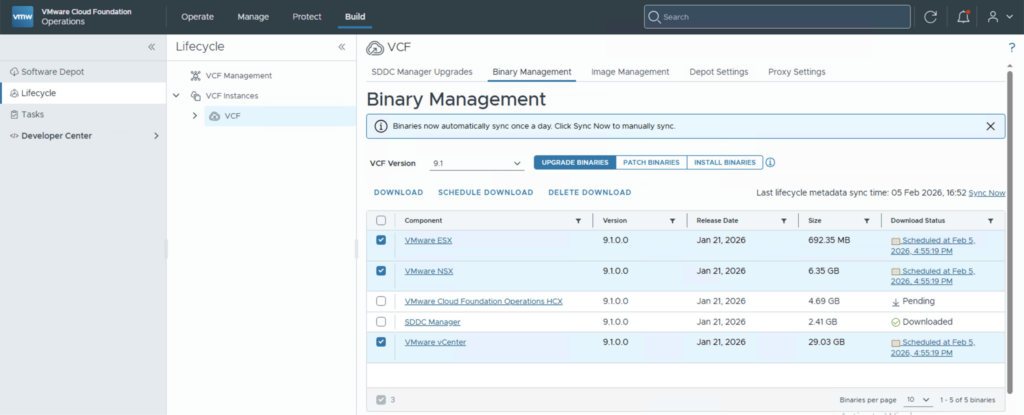
Do this before the maintenance window if possible. Waiting for large binaries to download while people are watching the change clock is not a great use of anyone’s time.
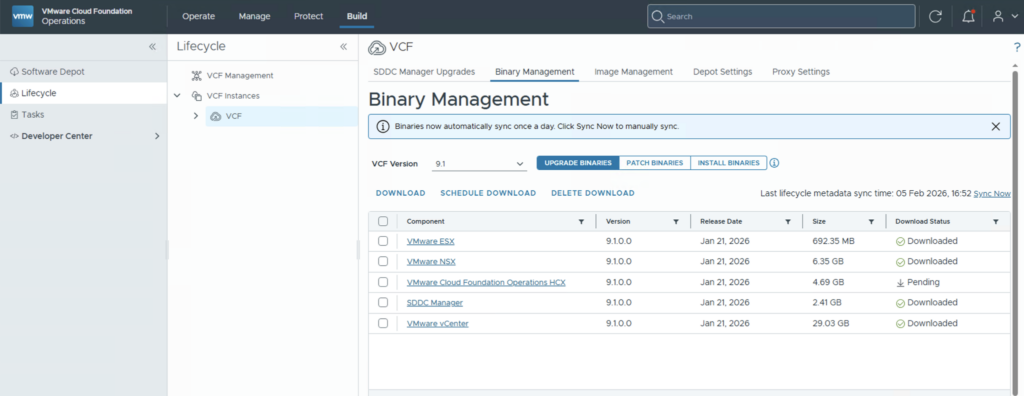
Step 4: Deploy VCF Management Services
Before you can touch the SDDC Manager upgrade or validate your adjacent dependencies properly, you have to deploy the new VCF Management Services cluster. This is where that new /28 or /27 CIDR block and the DNS records you prepared earlier come into play.
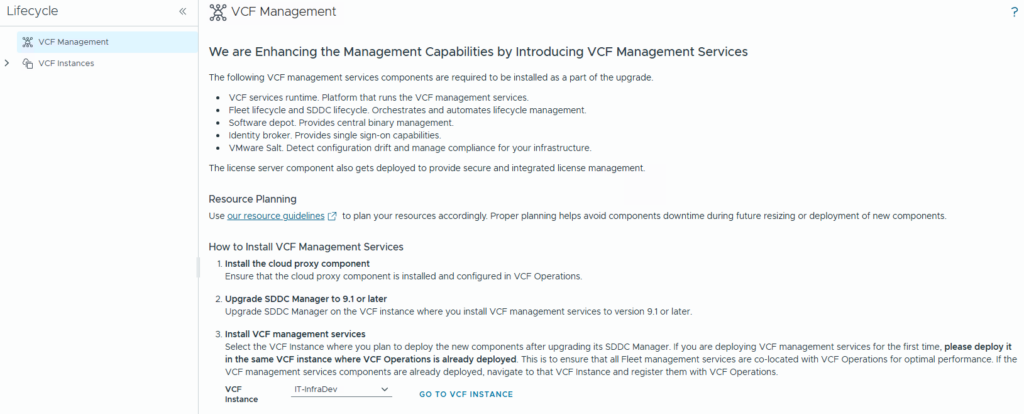
Because VCF 9.1 changes the management architecture, SDDC Manager will not allow you to proceed until this new service layer is up and running. It must own the inventory before orchestrating the rest of the stack.
The deployment flow looks like this:
- Log in to VCF Operations.
- Navigate to Build > Lifecycle.
- You will see a banner or task prompting you to Deploy Management Services (this replaces the old Fleet Management and vIDB components).
- Click Deploy to launch the configuration wizard.
- Input your Network Details: Enter the new CIDR block (e.g., 10.0.0.32/27) and provide the Gateway and VLAN details.
- Input your DNS Details: Map the provided FQDNs for the new services (like vcf-service-runtime, vcf-fleet-lifecycle, etc.) to the IPs within your new CIDR block.
- Run the specific Management Services Precheck. Do not click deploy if this shows DNS or network reachability errors.
- Click Deploy and monitor the task.
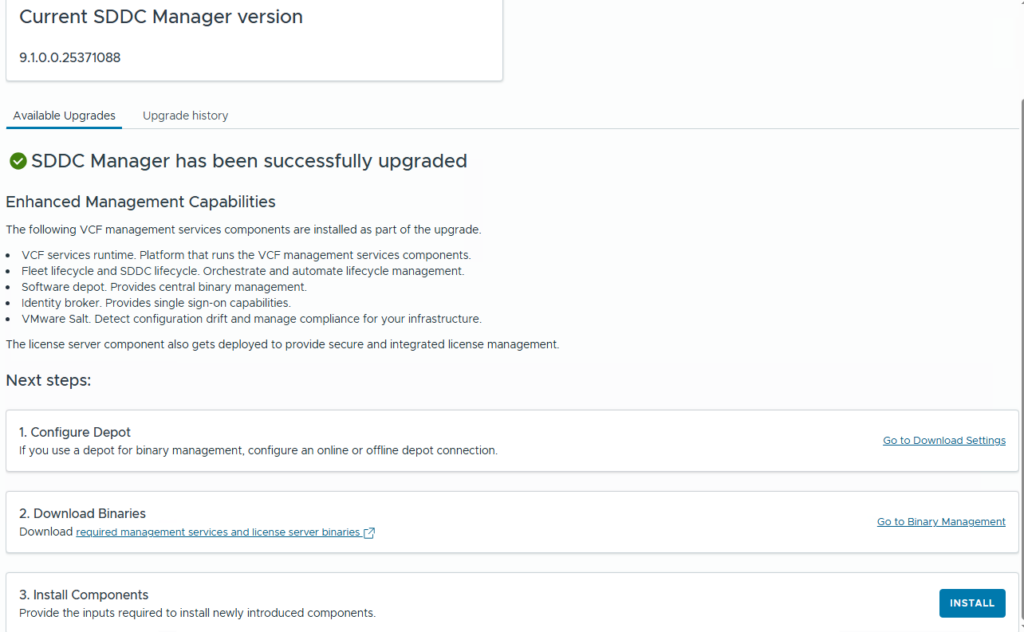
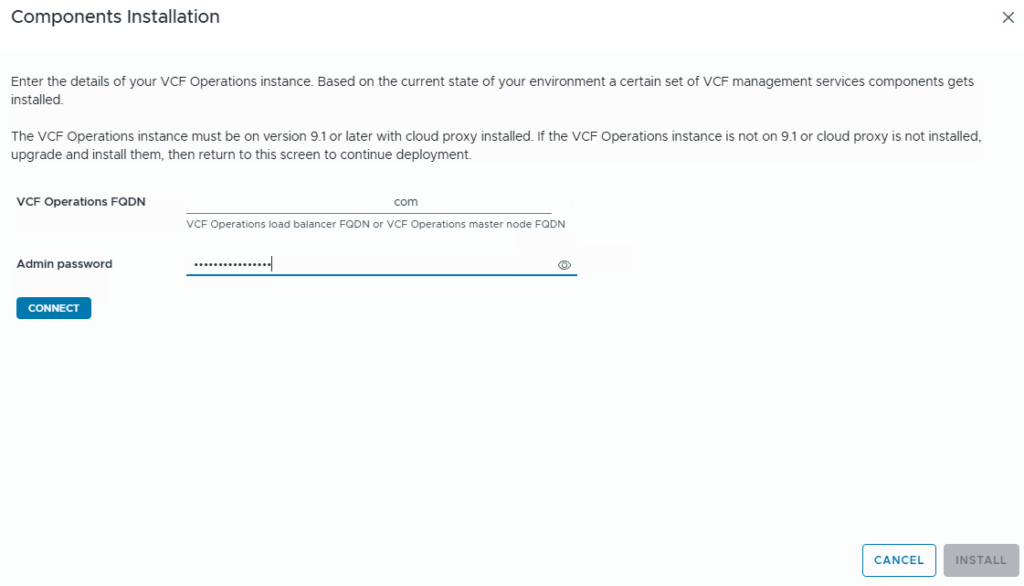
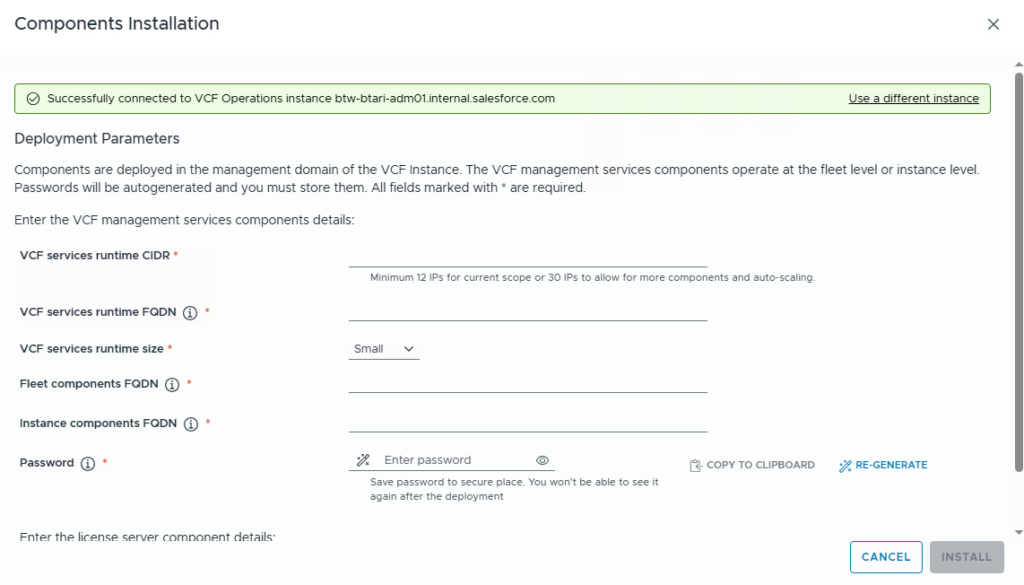
What happens in the background: The system will spin up the new Management Services nodes using the fresh IP block. Once they are healthy, it will seamlessly transfer the lifecycle operational control over to them.
Only after this task shows as Successful can you safely move on to validating and upgrading your dependency components and SDDC Manager.
Step 5: Handle VMware Live Recovery, SRM, and vSphere Replication
Now that Management Services are in place, if SRM or vSphere Replication is present, validate the supported upgrade path, confirm appliance health, and make sure protection groups, recovery plans, pairings, and replications are healthy before the core platform upgrade.
Step 6: Upgrade Avi Load Balancer Before SDDC Manager
If Avi Load Balancer is deployed, upgrade it before the SDDC Manager upgrade.
The minimum sensible checklist here is:
- Confirm current Avi Controller version.
- Validate the target version against VCF 9.1 compatibility.
- Run Avi prechecks.
- Confirm controller cluster health.
- Confirm service engine health.
- Confirm virtual services are healthy.
- Take backups according to the supported Avi procedure.
- Upgrade Avi before proceeding to SDDC Manager.
This is one of those “do it now or regret it later” dependencies.
Step 7: Upgrade SDDC Manager to 9.1
Once VCF Operations is upgraded, depot access is configured, binaries are downloaded, Management Services are running, SRM and Avi are validated/upgraded, and prechecks are clean, the next major step is SDDC Manager.
Before starting, confirm:
- Avi Load Balancer is already upgraded if present.
- The SDDC Manager upgrade binary is downloaded.
- SDDC Manager has a recent successful backup to external SFTP.
- A snapshot of the SDDC Manager appliance has been taken if that is part of your approved change plan.
- Managed components have recent successful backups.
- Upgrade prechecks have passed.
- NEW: You have your new /28 or /27 CIDR block and DNS records ready, and Management Services are successfully deployed.
The SDDC Manager upgrade is initiated from VCF Operations:
- Log in to VCF Operations.
- Go to Build.
- Open Lifecycle.
- Select the correct VCF instance.
- Open the SDDC Manager Updates tab.
- Download the SDDC Manager 9.1 update.
- When the download completes, click Update Now.
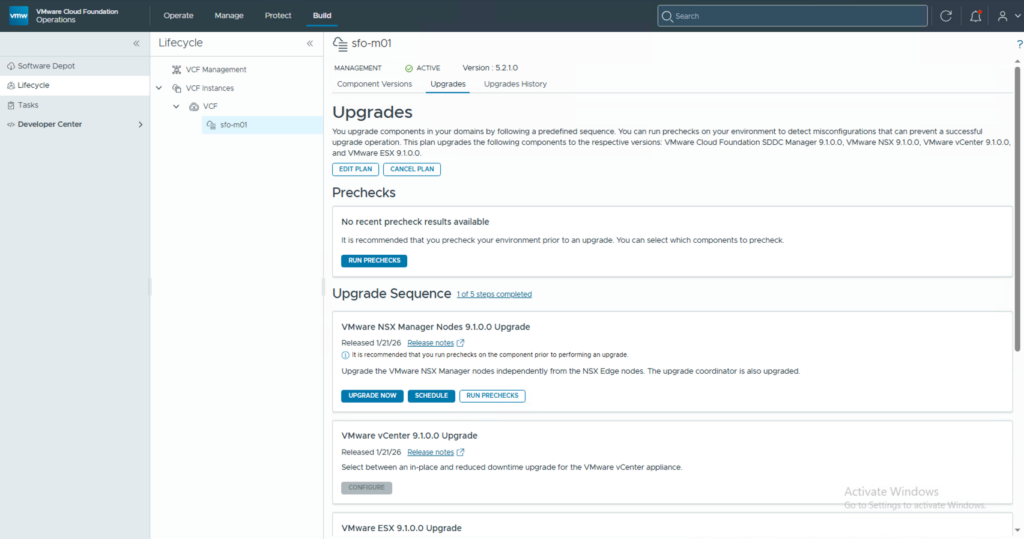
This is where discipline matters. Do not proceed if prechecks are red. Fix the issue first. “It is probably fine” is not a rollback plan.
Step 8: Plan the Management Domain Upgrade
After SDDC Manager is upgraded, plan the management domain upgrade. This allows you to define the target version and choose the upgrade scenario for components such as vCenter and NSX Manager.
- Log in to VCF Operations.
- Select Build.
- Open Lifecycle.
- Select the management domain.
- Open the Upgrades tab.
- Click Plan Domain Upgrade.
- Select the VCF target version.
- Select custom target versions if required.
- Select the upgrade scenario for vCenter and NSX Manager.
- Review and submit the plan.
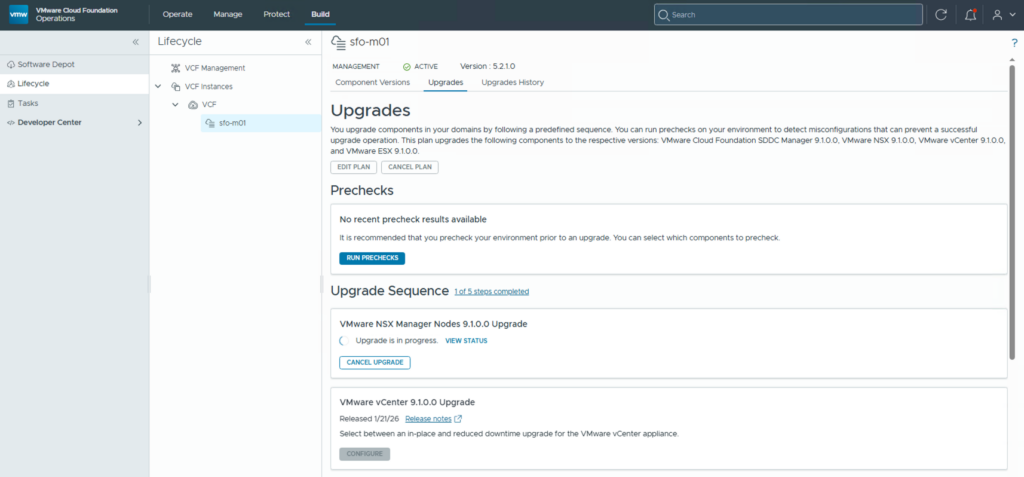
At this stage, you also decide whether to follow an optimized or sequential upgrade approach. The right answer depends on the size of your environment, maintenance window, operational risk, and how much parallel change you are comfortable with.
Step 9: Run Upgrade Prechecks
Run prechecks before touching NSX, vCenter, or ESX. Prechecks are not a formality. They are the platform telling you what will probably break if you continue.
Common areas to validate include:
- Cluster health.
- Host connectivity.
- vSAN health where applicable.
- NSX Manager and edge health.
- vCenter service health.
- Certificate validity.
- DNS and NTP consistency.
- Backup status.
- Available capacity.
- Lifecycle bundle readiness.
Resolve precheck failures before moving forward. Warnings should also be reviewed, because some “warnings” are really just future outages wearing polite clothing.
Step 10: Upgrade NSX
Upgrades NSX from VCF Operations lifecycle management.
- Log in to VCF Operations.
- Click Build.
- In the lifecycle pane, expand the VCF instance.
- Select the relevant domain.
- Open Upgrades.
- Click Upgrade Now for NSX.
- Click View Status to monitor progress.
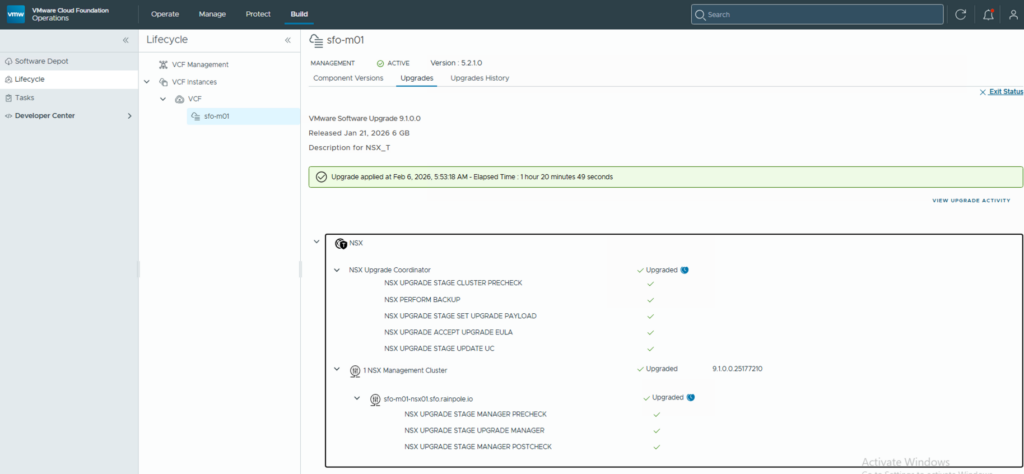
You can also verify progress directly from the NSX Manager UI. That is useful when you want more detail on manager nodes, edges, transport nodes, and overall NSX fabric health.
For NSX, I would be extra strict with health checks before and after the upgrade. Management plane, control plane, transport nodes, edges, and routing should all be validated before moving to the next component.
Step 11: Upgrade vCenter
The vCenter upgrade flow requires temporary network configuration. Prepare that information before starting the wizard.
Prerequisites :
- Temporary free IP address from the same subnet.
- vCenter snapshot.
- Subnet details.
- Gateway details.
The upgrade is configured from VCF Operations:
- Log in to VCF Operations.
- Select Build.
- Open Lifecycle.
- Select the relevant VCF instance.
- For vCenter, click Configure.
- Review the upgrade mechanism.
- Select the backup option.
- Configure the temporary network settings.
- Review the settings.
- Schedule the upgrade.
- Select immediate execution if that matches your change window.
- Choose automatic switchover if that is the approved approach.
- Monitor progress using View Status.
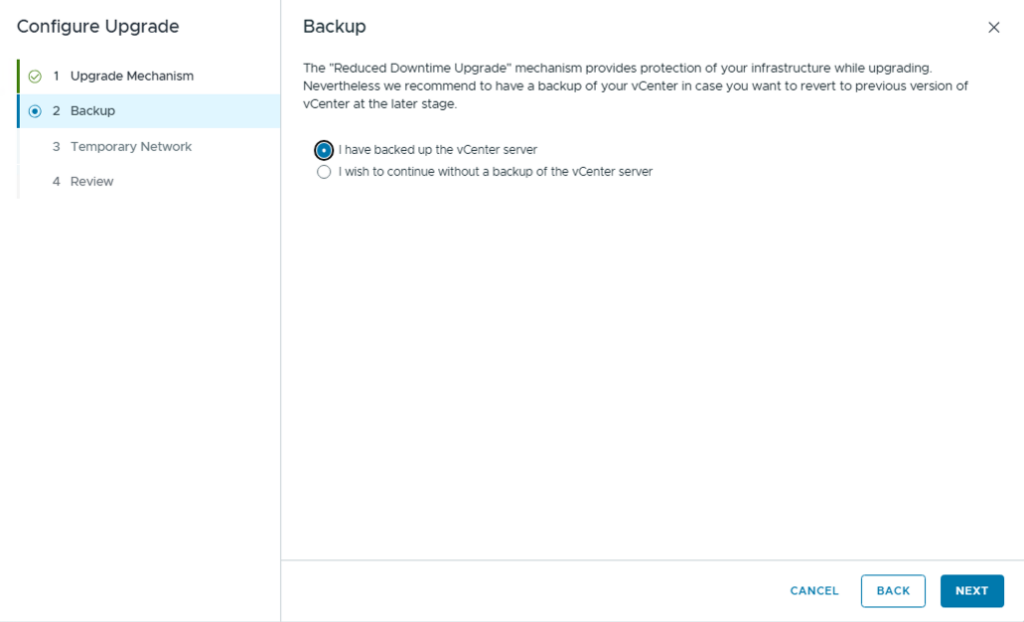
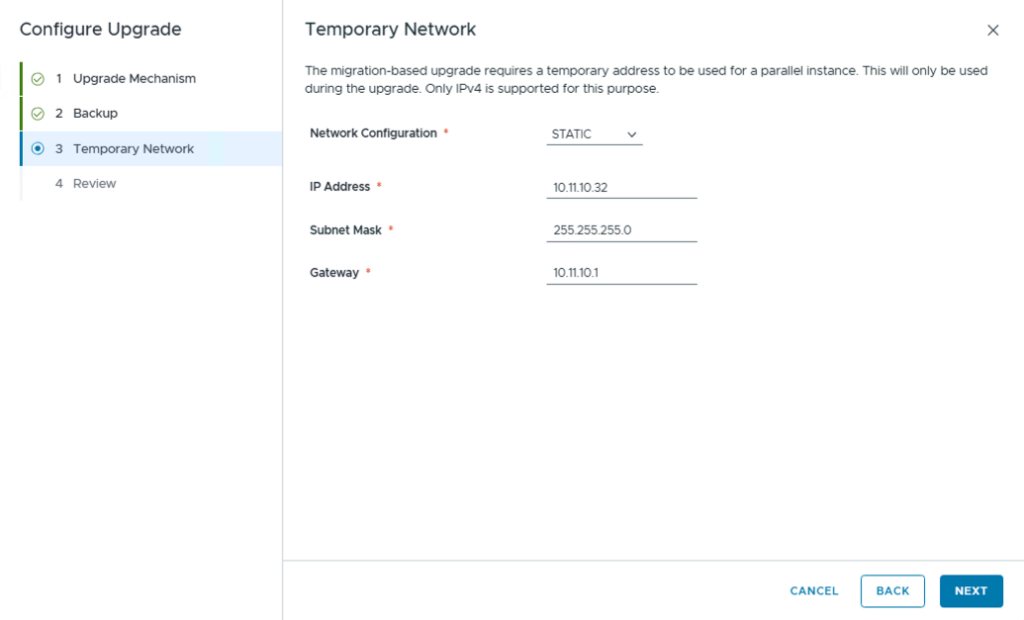
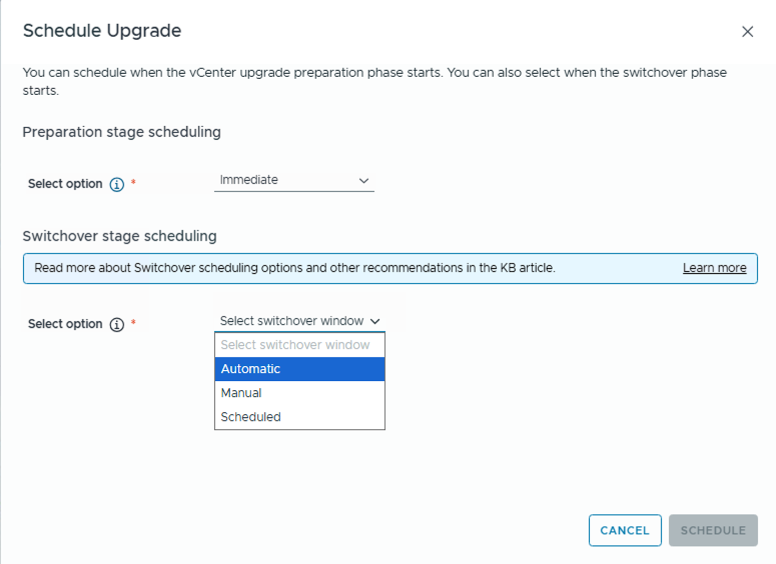
After the upgrade completes, verify the vCenter version from both the VCF lifecycle view and the vCenter UI. Do not rely on only one screen.
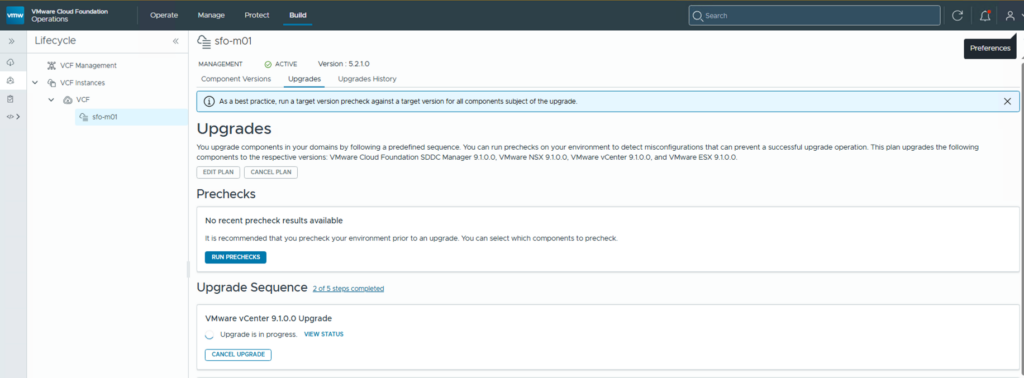
Step 12: Import the ESX Image
Before upgrading ESX hosts, import the required ESX image into lifecycle image management.
- Log in to VCF Operations.
- Select Build.
- Open Lifecycle.
- Select the VCF instance.
- Click Image Management.
- Select the import method.
- Provide the required image information.
- Click Import.

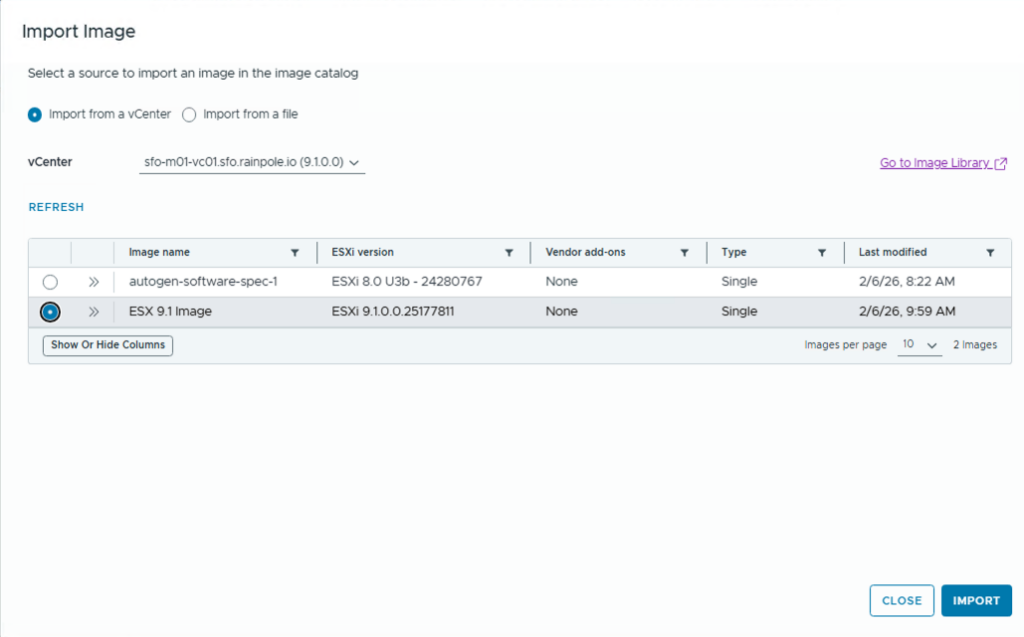
Make sure the image is available before scheduling host upgrades. This is another easy place to lose time during a maintenance window.
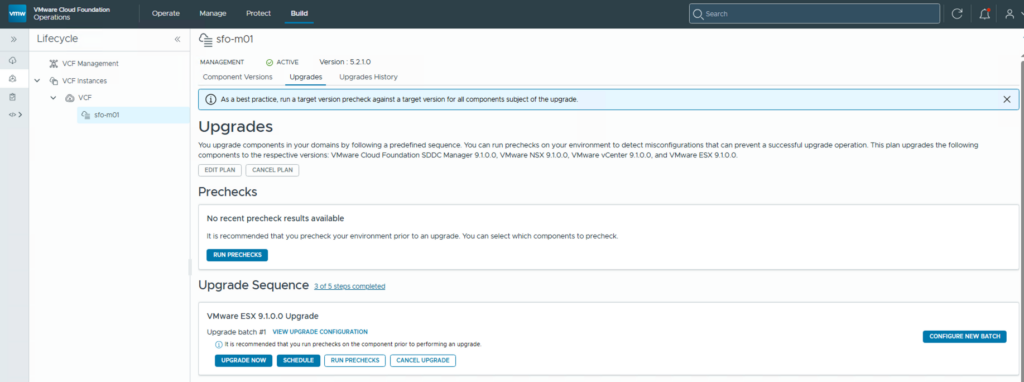
Step 13: Configure the ESX Upgrade
The ESX upgrade is also driven from VCF Operations lifecycle management.
- Log in to VCF Operations.
- Select Build.
- Open Lifecycle.
- Select the VCF instance.
- For VMware ESX 9.1, click Configure.
- Review the introduction page.
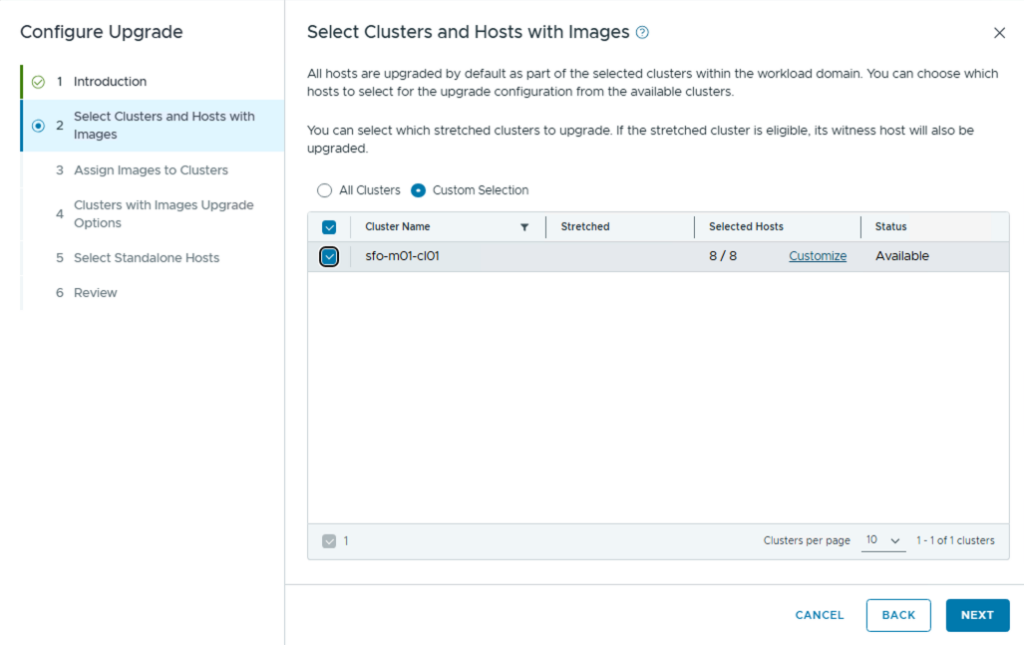
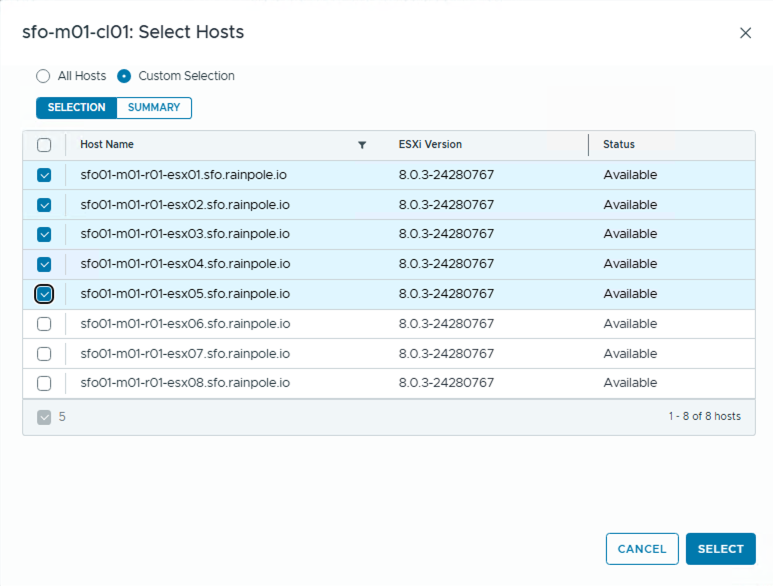
- Select the clusters or individual hosts to upgrade.
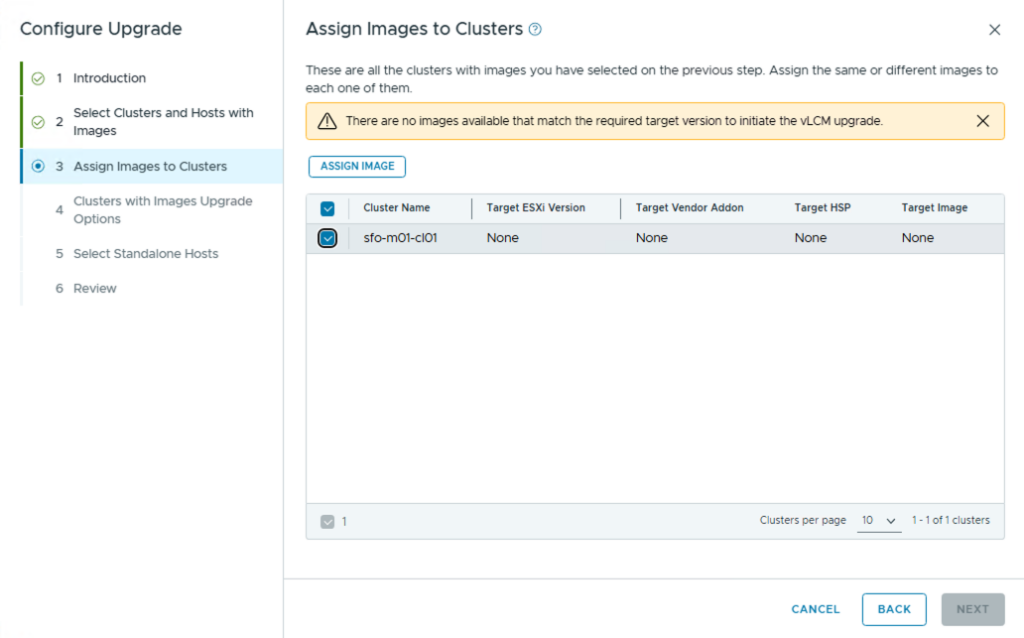
- Assign the ESX image to the selected cluster or clusters.
- Choose upgrade options.
- Select any standalone hosts if applicable.
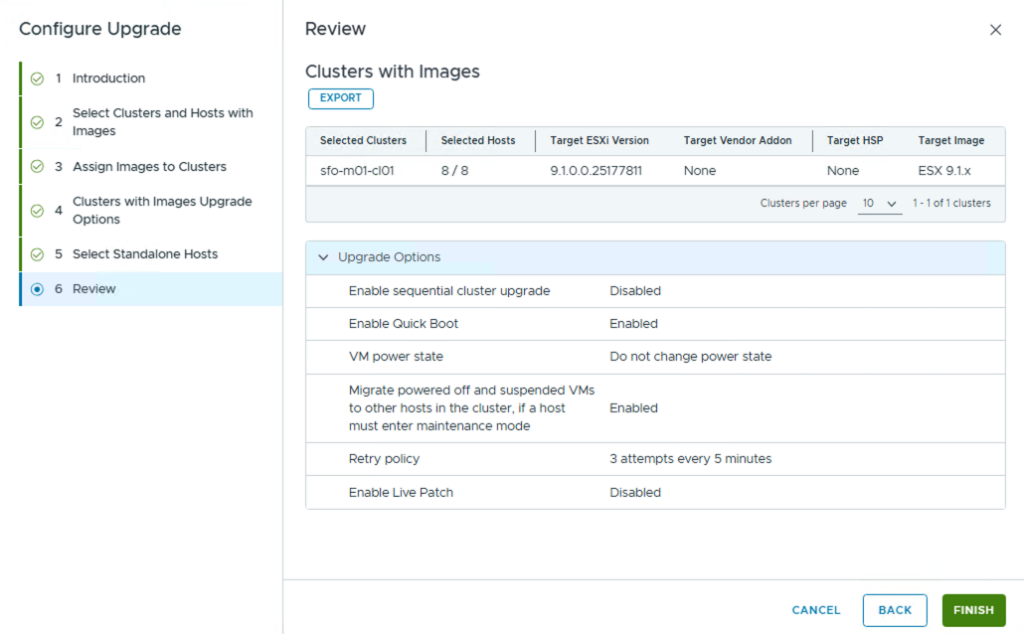
- Review the settings.
- Click Finish.
- Click Upgrade Now.
- Monitor the status using View Status.
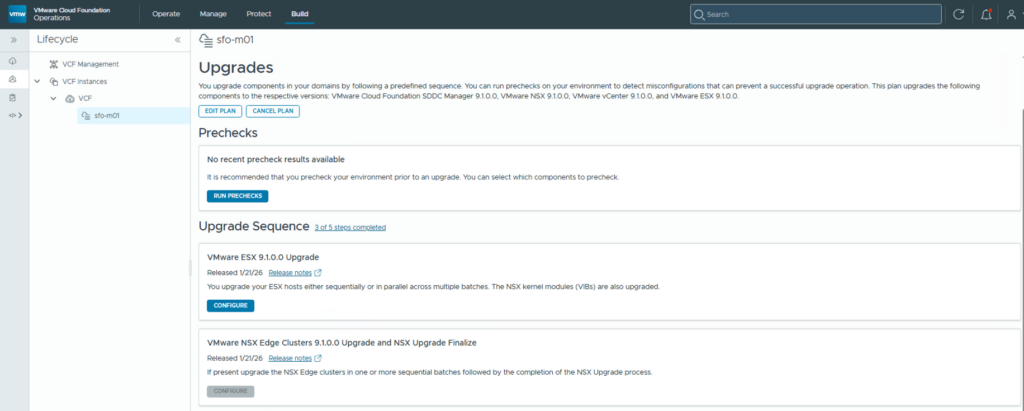
Cluster Selection
You can upgrade all clusters or use a custom selection. In a lab, upgrading everything in one go may be fine. In production, I would normally prefer a controlled rollout unless the environment and maintenance window justify a broader upgrade.
Host Selection
This is useful when you want to move in batches instead of upgrading everything at once.
Assign the Image
After selecting the clusters, assign the imported ESX image. The wizard allows you to choose from available images and apply the selected image to the target clusters.
Review and Start
Review the configuration carefully before starting. Once you are happy with the plan, finish the wizard and start the upgrade.
During host upgrades, watch cluster health, DRS activity, host maintenance mode transitions, workload evacuation, and any vSAN resync activity if vSAN is part of the environment.
Post-Upgrade Validation
When all upgrades complete successfully, the job is not finished. The platform may be upgraded, but you still need to prove it is healthy.
Post-upgrade validation should include:
- VCF Operations cluster status.
- SDDC Manager health.
- VCF lifecycle view showing expected component versions.
- NSX Manager cluster health.
- NSX transport node status.
- Edge node status where applicable.
- vCenter service health.
- ESX host versions.
- Cluster compliance.
- vSAN health where applicable.
- Backup jobs after the upgrade.
- Cloud proxy health.
- Recovery component health if SRM / replication is deployed.
Only after validation should you remove temporary snapshots and take fresh backups of the newly upgraded components.
Important Logs to Check
The exact log paths depend on the component and version, but operationally you should be ready to check logs for:
- VCF Operations update workflow.
- SDDC Manager lifecycle operations.
- NSX upgrade orchestration.
- vCenter upgrade workflow.
- ESX host remediation.
- Depot and binary download issues.
- Cloud proxy upgrade status.
My advice: collect the relevant log locations before the change window. When something fails at 2 AM, that is not the time to start searching documentation for where the log file lives.

Lessons from the Lab
The upgrade flow itself is logical, but there are several places where preparation makes the difference between a clean upgrade and a messy one.
Do Not Start Without Clean Prechecks
Prechecks are there for a reason. If the platform tells you something is wrong before the upgrade, believe it. Fix it first.
Do Not Ignore Supporting Components
Avi, SRM, vSphere Replication, cloud proxies, and depot connectivity can all influence the upgrade experience. The core stack is not the only thing that matters.
Download Binaries Early
Binary downloads should not be part of the risky section of the change window. Configure the depot, verify connectivity, and download what you need before the maintenance clock starts.
Have Temporary Network Details Ready
The vCenter upgrade needs temporary network configuration. Have the temporary IP, subnet, and gateway details documented and validated before the change starts.
Validate from Multiple Places
Do not trust one green checkmark. Validate from VCF Operations, SDDC Manager, vCenter, NSX Manager, and the host level. The more critical the environment, the more boring and repetitive your validation should be.
Final Thoughts
Upgrading from VMware Cloud Foundation 9.0.2 to 9.1 is a manageable process, but it is still a full-stack platform upgrade. Treat it with respect.
The big takeaway is simple: upgrade VCF Operations first, configure the depot, download your binaries, deploy VCF Management Services, handle dependency components (SRM/Avi), upgrade SDDC Manager, plan the domain upgrade, run prechecks, then move through NSX, vCenter, and ESX in a controlled sequence.
Angry Admin verdict:
VCF 9.1 upgrades are not scary if you respect the order, prepare your backups, validate your dependencies, and do not skip prechecks. Skip the boring work, and the platform will happily teach you why boring work exists.