Importing an existing vCenter Server into VMware Cloud Foundation is not always the end of a brownfield migration. In some cases, the import completes successfully, but the version of NSX Manager selected during the import creates a blocker later in the upgrade process.
That is exactly what happened during our import of an existing vCenter 8 environment as a VMware Cloud Foundation Workload Domain.
The imported vCenter was running:
Version: 8.0.3.00800
Build number: 25197330
During the initial brownfield import, SDDC Manager deployed NSX Manager version:
4.2.4.1
The NSX version was compatible with the existing vCenter, but it did not have the required supported upgrade path for the VCF 9.1 upgrade workflow.
At that point, the environment was blocked by what is commonly described as an NSX back-in-time issue.
What Is an NSX Back-in-Time Issue?
An NSX upgrade is not evaluated only by comparing major version numbers.
For example, moving from NSX 4.x to NSX 9.x might look like a normal forward upgrade. However, VMware also considers the release chronology and build numbers of the source and destination versions.
If the currently installed NSX build was released after the NSX build included in the target VCF release, the upgrade can be interpreted as attempting to move from a newer build to an older build.
That is considered a back-in-time operation and is blocked.
Broadcom describes this as a chronological upgrade restriction: a numerically higher major version does not automatically represent a newer software build.
During a brownfield import, SDDC Manager normally selects the latest NSX version compatible with the vCenter being imported. That version may be compatible with the current vCenter but still unsuitable for the planned VCF upgrade path.
The important lesson is:
Always validate both current interoperability and the future NSX upgrade path before importing a brownfield vCenter.
The Resolution
The solution was not to downgrade the running NSX Manager.
Instead, we had to:
- Remove the failing imported Workload Domain.
- Remove the existing NSX Manager 4.2.4.1 deployment.
- Remove the relationship between NSX and vCenter.
- Remove the Workload Domain hosts and domain from SDDC Manager inventory.
- Remove stale vCenter extensions.
- Override the NSX version selected during the next import.
- Import the vCenter again using NSX 4.2.3.3.
- Resolve the remaining VCF upgrade precheck failures.
At the close of the troubleshooting call, the NSX upgrade-path blocker had been resolved and the vCenter upgrade for the Workload Domain was in progress.
Reference Documentation
The two main Broadcom Knowledge Base articles used were:
- KB 430524: Upgrading a Brownfield-imported domain fails during the upgrade precheck phase due to an unsupported upgrade path for NSX.
- KB 429205: Overriding the version of NSX Manager while converging or importing an existing vCenter instance.
KB 430524 documents the removal and re-import procedure, while KB 429205 explains how to override the NSX version selected by the import workflow.
Step 1: Check the Workload Domain
Before removing anything, we first recorded the details of the affected Workload Domain.
In SDDC Manager, navigate to:
Inventory
→ Workload Domains
→ Select the affected Workload Domain
The Workload Domain ID can be found in the browser URL after selecting the domain.
Next, open the Services tab and record:
- The vCenter FQDN
- The NSX Manager FQDN
- The Workload Domain ID
Broadcom specifically recommends collecting these details before starting the removal process.
Generate an SDDC Manager API Token
The following is the command used in the Broadcom KB:
TOKEN=$(curl -H 'Content-Type:application/json' https://localhost/v1/tokens -d '{"username" : "admin@local","password":"<Password>"}' -k | jq -r '.accessToken')
The password has been replaced with a placeholder.
Check the Hosts Assigned to the Workload Domain
Use the Workload Domain ID to retrieve the hosts assigned to it:
curl -k -H "Authorization: Bearer $TOKEN" -H "Content-Type: application/json" -X GET https://localhost/v1/hosts?domainId={domain-id}
Record the ID of every ESXi host returned by this command.
The command and manual host-ID collection process are documented in KB 430524.
Step 2: Remove NSX from the Workload Domain Clusters
In NSX Manager, navigate to:
System
→ Fabric
→ Hosts
→ Clusters
Select the clusters associated with the imported vCenter and click:
Remove NSX
Wait for the process to complete.
When the NSX removal has finished, all hosts should display:
NSX Configuration: Not Configured
After removing NSX, check the cluster image compliance in the vSphere Client:
Cluster
→ Updates
→ Hosts
→ Image
→ Check Compliance
If the cluster is not compliant, remediate it before continuing.
Step 3: Remove the Compute Manager
In NSX Manager, navigate to:
System
→ Fabric
→ Compute Managers
Locate the Compute Manager associated with the imported vCenter.
Click the three-dot menu and select:
Delete
This removes the relationship between the NSX Manager and the vCenter Server.
Step 4: Delete the Existing NSX Manager
After NSX had been removed from the ESXi hosts and the Compute Manager registration had been deleted, we removed the NSX Manager appliances.
In vCenter:
- Select the NSX Manager virtual machine.
- Select Actions → Power → Power Off.
- Confirm the power-off operation.
- Select Actions → Delete from Disk.
- Confirm the deletion.
This removed the NSX 4.2.4.1 deployment associated with the failed Workload Domain import.
Step 5: Remove the NSX Cluster from SDDC Manager Inventory
The next step was to remove the NSX cluster association from SDDC Manager.
The command from KB 430524 is:
curl -i -X DELETE http://localhost/inventory/extensions/vi/nsxtclusterdomains/{domain-id}
The real Workload Domain UUID has been replaced with:
{domain-id}
This command must only be used when the NSX Manager belongs exclusively to the affected Workload Domain. If the NSX Manager is shared with another domain, this step must be skipped.
Step 6: Remove the ESXi Hosts from SDDC Manager Inventory
Using the host IDs returned earlier, create a file called:
ESXiIds.json
The file should contain the ESXi host IDs in the format shown in the KB:
[
    {
        "id": "host-id-1"
    },
    {
        "id": "host-id-2"
    },
    {
        "id": "host-id-3"
    },
    {
        "id": "host-id-4"
    }
]
Remove the hosts from SDDC Manager inventory:
curl -s -X DELETE http://localhost/inventory/extensions/decommission/hosts -H "Content-Type: application/json" -d @ESXiIds.json
Only the IDs belonging to the affected Workload Domain should be included in this file.
Step 7: Remove the Workload Domain
After removing the host records, remove the Workload Domain itself:
curl -s -X DELETE http://localhost/inventory/extensions/vi/domains/{domain-id}
To check the remaining domain inventory, run:
curl -i -X GET http://localhost/inventory/extensions/vi/domainInventory
Confirm that the removed Workload Domain no longer appears in the output. These are the inventory-removal and validation commands provided in KB 430524.
Step 8: Remove the Stale vCenter Extensions
The next step was to clean up the plugin registrations left in vCenter.
Open the vCenter Managed Object Browser:
https://<vCenter-FQDN>/mob
Navigate to:
content
→ ExtensionManager
KB 430524 specifically instructs administrators to remove:
com.vmware.sddcManager
Under the Methods section:
- Select
UnregisterExtension. - Enter the extension name.
- Click
Invoke Method. - Refresh the Extension Manager page.
- Confirm that the extension is gone.
However, in our environment, removing only the SDDC Manager extension was not enough.
An additional NSX-T extension also had to be removed:
com.vmware.nsx.management.nsxt
This additional extension was still linking the vCenter to the previously removed NSX Manager.
Broadcom documents that failed brownfield imports can leave stale SDDC Manager and NSX extensions registered in vCenter. The documented stale extension list includes both com.vmware.sddcManager and com.vmware.nsx.management.nsxt.
Step 9: Confirm the Required NSX Binary
Before repeating the import, we confirmed that the required NSX installation binary had been downloaded into the SDDC Manager depot.
The required NSX build was:
NSX version: 4.2.3.3.0
Build: 25171318
This is important because the version override does not eliminate the requirement for the installation binary.
If the required binary is not downloaded, the import precheck will report that the required NSX installation image is unavailable.
Step 10: Override the NSX Version
SDDC Manager automatically selects an NSX Manager version based on the vCenter version being imported.
KB 429205 provides a workaround that allows a specific NSX Manager version to be selected instead.
The required vCenter information was collected from the vCenter VAMI:
Version:
8.0.3.00800

Build number:
25197330
The property had to be added to both the Domain Manager and Operations Manager configuration files.
Domain Manager
File:
/etc/vmware/vcf/domainmanager/application.properties
The exact property used during this troubleshooting was:
vcf.nsx.vcenter.compatible.versions=4.2.3.3.0-25171318:8.0.3-24853646,8.0.3.00800-25197330
Operations Manager
File:
/etc/vmware/vcf/operationsmanager/application.properties
The exact property used during this troubleshooting was:
vcf.nsx.vcenter.compatible.versions=4.2.3.3.0-25171318:8.0.3-25197330,8.0.3.00800-25197330
These values are intentionally reproduced exactly as they were used during the incident and have not been normalized or rewritten.
KB 429205 defines the property format as:
<NSX_Version>:<vCenter_Format-1>,<vCenter_Format-2>
Format 1 uses the vCenter major version and build number, while Format 2 uses the full vCenter version and build number.
Step 11: Restart Domain Manager and Operations Manager
After updating the two property files, restart the services using the commands from the KB:
systemctl restart domainmanager
systemctl restart operationsmanager
Wait for both services to become active.
Check Domain Manager:
curl localhost/domainmanager/about
Check Operations Manager:
curl localhost/operationsmanager/about
These are the service restart and validation commands documented in KB 429205.
While repeating the import, the Domain Manager log can be monitored using:
tail -n 100 -f /var/log/vmware/vcf/domainmanager/domainmanager.log
This was useful for checking which NSX version and binary the brownfield workflow selected.
Step 12: Repeat the Brownfield Import
After the services were restarted, we repeated the vCenter import.
On the first attempt, the newly deployed NSX Manager still appeared as:
4.2.4.1
The compatible-version values were then corrected, the failed Workload Domain was removed again, and the deployment was repeated.
After the correct values had been applied, the Workload Domain deployed successfully using the required NSX binary.
Once the import was successful, the temporary vcf.nsx.vcenter.compatible.versions property could be removed from both configuration files.
KB 429205 instructs administrators to remove the override after the import succeeds and restart both services again.
Remaining VCF Upgrade Precheck Failures
Resolving the NSX back-in-time blocker allowed us to continue, but several additional prechecks still had to be addressed.
ESXi Hosts Were Using Short Names
The upgrade prechecks failed because the ESXi hosts were reporting short names instead of fully qualified domain names.
SDDC Manager could not correctly reach the hosts using the expected FQDNs.
The command used to update the ESXi domain suffix was:
esxcli system hostname set --domain=internal.example.com
The real internal DNS domain has been replaced with:
internal.example.com
The hostname configuration was then checked using:
esxcli system hostname get
Broadcom also documents the following commands when changing the complete ESXi hostname and FQDN:
esxcli system hostname set --host=new-hostname
esxcli system hostname set --fqdn=new-hostname.domain.com
esxcli system hostname get
The host should be placed into Maintenance Mode and removed from the vCenter inventory before a complete hostname change, then added back using its FQDN. DNS records must also match the new configuration.
Once the ESXi hostname information showed the correct FQDN, SDDC Manager could communicate with the hosts and the precheck passed.
NSX and vCenter Backup Warnings
The prechecks also reported backup failures for both NSX and vCenter.
For this upgrade, these checks could be treated as warnings rather than hard blockers. However, they still require further investigation before repeating the process in production.
The other active vCenter Servers were not successfully completing their scheduled file-level backups.
Cohesity was protecting the appliances, but these backups were not visible in the vCenter VAMI backup interface.
Before progressing with production, the following must be confirmed:
- Whether Cohesity protection satisfies the required vCenter recovery method.
- Whether application-consistent vCenter recovery is supported.
- Whether an NSX configuration backup is completing successfully.
- Whether the latest backups have been restore-tested.
- Whether file-level vCenter backups should also be configured.
A third-party VM backup and a successful vCenter file-based backup are not necessarily the same recovery mechanism.
Missing SDDC Manager Depot URL
Another precheck failed because the SDDC Manager depot URL was not configured in vCenter.
The error was:
SDDC Manager depot url is not configured in vCenter
In the vSphere Client, navigate to:
Lifecycle Manager
→ Settings
→ Download Sources
Click New and add:
https://[SDDC_MANAGER_FQDN]/vmware/vcf/umds/patch-store/hostupdate/__hostupdate20-consolidated-index__.xml
Replace [SDDC_MANAGER_FQDN] with the actual SDDC Manager FQDN.
After adding the source, rerun the SDDC Manager precheck. This is the resolution documented in KB 402522.
Anti-Affinity Rule Failure
An anti-affinity rule also blocked the SDDC component upgrade.
The error indicated that placing a host into Maintenance Mode would violate an anti-affinity rule similar to:
Entering maintenance mode would violate affinity rules:
VI-1-anti-affinity-rule-nsxt
This can occur when the cluster does not have enough available ESXi hosts to maintain the NSX Manager or Edge anti-affinity placement while another host enters Maintenance Mode.
The preferred solution is to add sufficient host capacity.
Where that is not immediately possible, the affected rule can be disabled temporarily.
In the vSphere Client:
Hosts and Clusters
→ Select the affected cluster
→ Configure
→ VM/Host Rules
Locate the rule reported by the precheck, edit it and clear:
Enable rule
After the upgrade, the rule should be enabled again to restore the intended resiliency.
Cluster Baseline and Image Warning
The cluster also reported a baseline image warning.
To resolve it, we created a vSphere Lifecycle Manager image for the affected cluster.
In the vSphere Client:
Cluster
→ Updates
→ Image
After creating the image, we checked the cluster compliance and resolved the warning.
The brownfield domain recovery procedure also requires the cluster image to be checked after NSX has been removed from the hosts. If the cluster is not compliant, it must be remediated before continuing.
Final Resolution Summary
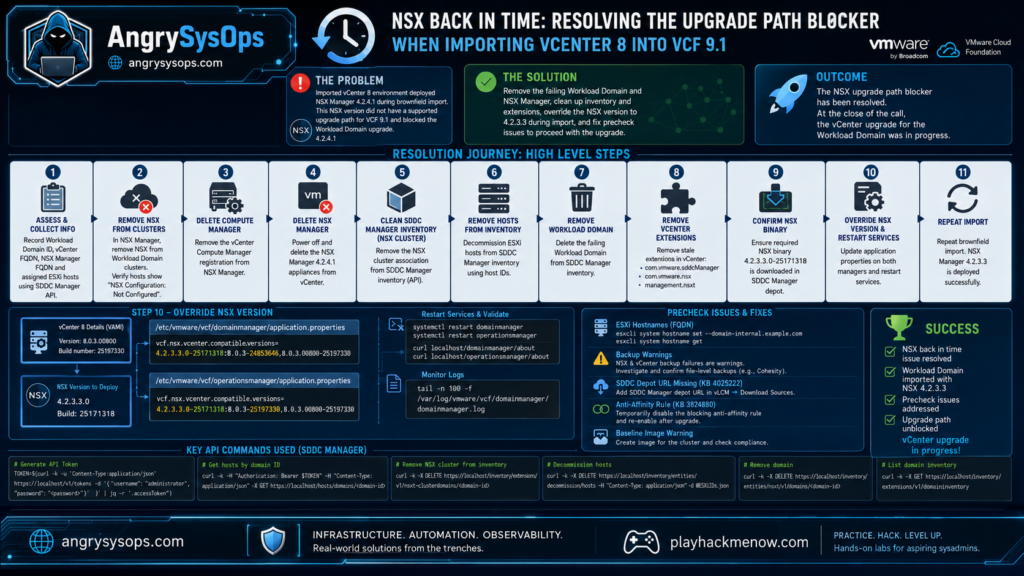
The full resolution process was:
- Record the Workload Domain ID, vCenter FQDN and NSX Manager FQDN.
- Remove NSX from the Workload Domain clusters.
- Check vLCM image compliance.
- Remove the vCenter Compute Manager registration from NSX.
- Power off and delete the NSX Manager 4.2.4.1 appliances.
- Remove the NSX cluster from SDDC Manager inventory.
- Retrieve the ESXi host IDs associated with the domain.
- Remove the hosts from SDDC Manager inventory.
- Remove the failed Workload Domain.
- Check the SDDC Manager domain inventory.
- Remove the stale
com.vmware.sddcManagerextension. - Remove the additional
com.vmware.nsx.management.nsxtextension. - Confirm that the NSX 4.2.3.3.0-25171318 binary was downloaded.
- Update the Domain Manager and Operations Manager property files.
- Restart Domain Manager and Operations Manager.
- Repeat the brownfield import.
- Confirm that the required NSX Manager version was deployed.
- Correct the ESXi FQDN configuration.
- Investigate the vCenter and NSX backup warnings.
- Add the SDDC Manager depot URL to Lifecycle Manager.
- Temporarily disable the blocking anti-affinity rule.
- Create the cluster image and check compliance.
- Repeat the VCF upgrade prechecks.
After completing these steps, the NSX upgrade-path blocker was resolved.
At the close of the troubleshooting call, the vCenter upgrade for the Workload Domain was in progress.
Lessons Learned
This incident demonstrated that successful vCenter and NSX interoperability during an import does not guarantee a supported future upgrade.
Before importing a brownfield vCenter into VMware Cloud Foundation, validate:
Current vCenter version
        ↓
NSX version selected during import
        ↓
Supported NSX upgrade path
        ↓
Target VMware Cloud Foundation version
The most important lessons were:
- Check the NSX upgrade path before importing the vCenter.
- Do not rely only on major version numbers.
- Verify the full build numbers and release chronology.
- Confirm that the required NSX installation binary is downloaded.
- Record the Workload Domain and host IDs before changing the inventory.
- Check for stale SDDC Manager and NSX extensions after a failed import.
- Use FQDNs consistently for ESXi hosts.
- Confirm the SDDC Manager depot is configured in vSphere Lifecycle Manager.
- Review backup warnings before repeating the process in production.
- Re-enable temporarily disabled anti-affinity rules after the upgrade.
- Validate cluster image compliance before continuing.
Sometimes, moving a VMware Cloud Foundation environment forward requires taking NSX one carefully controlled step back.